Task Configuration
We have described about tasks and what they are here. There are too many different search engines and set up that you can use the bot for. You can also add as many as taks you want for every campaign.
If you add multiple tasks to one campaign, all of the tasks will be executed in order in every single browser session. So, for instance you can make the bot visit social media websites. Moreover, you can add a task to search for your keyword and make a click on it.
Here we'll learn how to create a single task. You can then add and combine them as however you like.
Search Engine Mode
In this method, the bot will search your keyword on the selected search engine then it will look for your website in the results. It will scroll down and browse the results page to find your website and click on it.
Configure
STEP1: Go to the step 3 of the campaign setup and click on "add a task" button.
STEP2: Select and click on Search Engine Traffic to open the traffic mode settings and configuration. After selecting the mode, enter your keywords by pressing ENTER button or separating it with " , ". Then, you can add the website or webpage address that you want to target. The bot will look for the results that include your address. So, if your domain doesn't have www. in the address but you enter the www, the bot will not be able to find your result. Make sure you enter the domain address as you mostly see in the results page.
If you're using Google Maps or Naver Maps, you need to enter the business name as it appears in the listing, instead of entering your website address
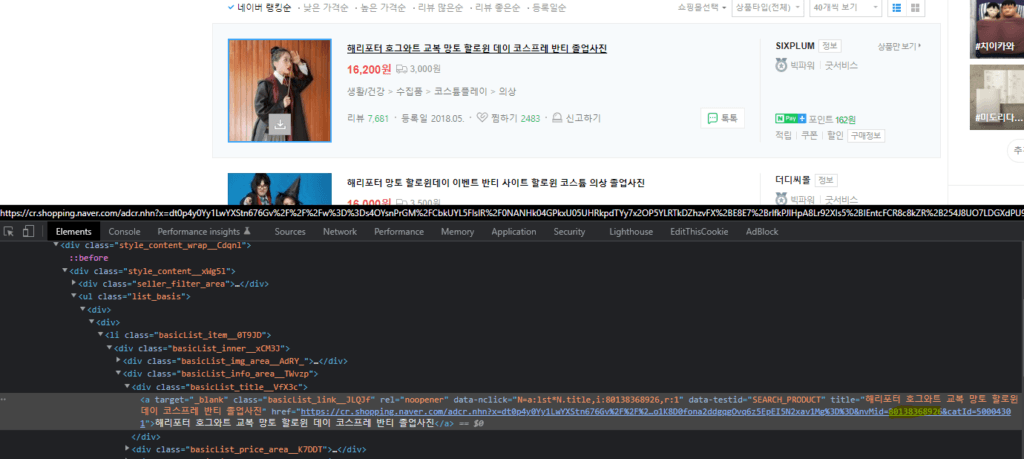
NOTE: If you’re going to use Naver Shopping (네이버쇼핑), you’ll need to enter your product’s mid. You can right-click and copy the link of your website on Naver shopping then get the nvMid of your product. That’s how Naver Shopping will be going to work!
The bot will look for website addresses that include the written text. It's better to write only your domain address, if you don't have any other competitors using the similar address. This will also help you to cover amp addresses as well.
If you're trying to make a complicated campaign with several tasks inside and then use it as a template for importing the keywords from a text file, you can write the keyword as {keyword} and also the target website as {website}. The bot will replace them while importing the target keywords and websites from a text file.
STEP3: If you want to send clicks from a country-specified or different TLD of the selected search engine, you can choose from the list if any is available. You can also choose your search language if your keyword is not English, this will help get better results. You can also specify the results page that you want the bot to look for your results in (For instance we've selected 1 to 10 pages here).
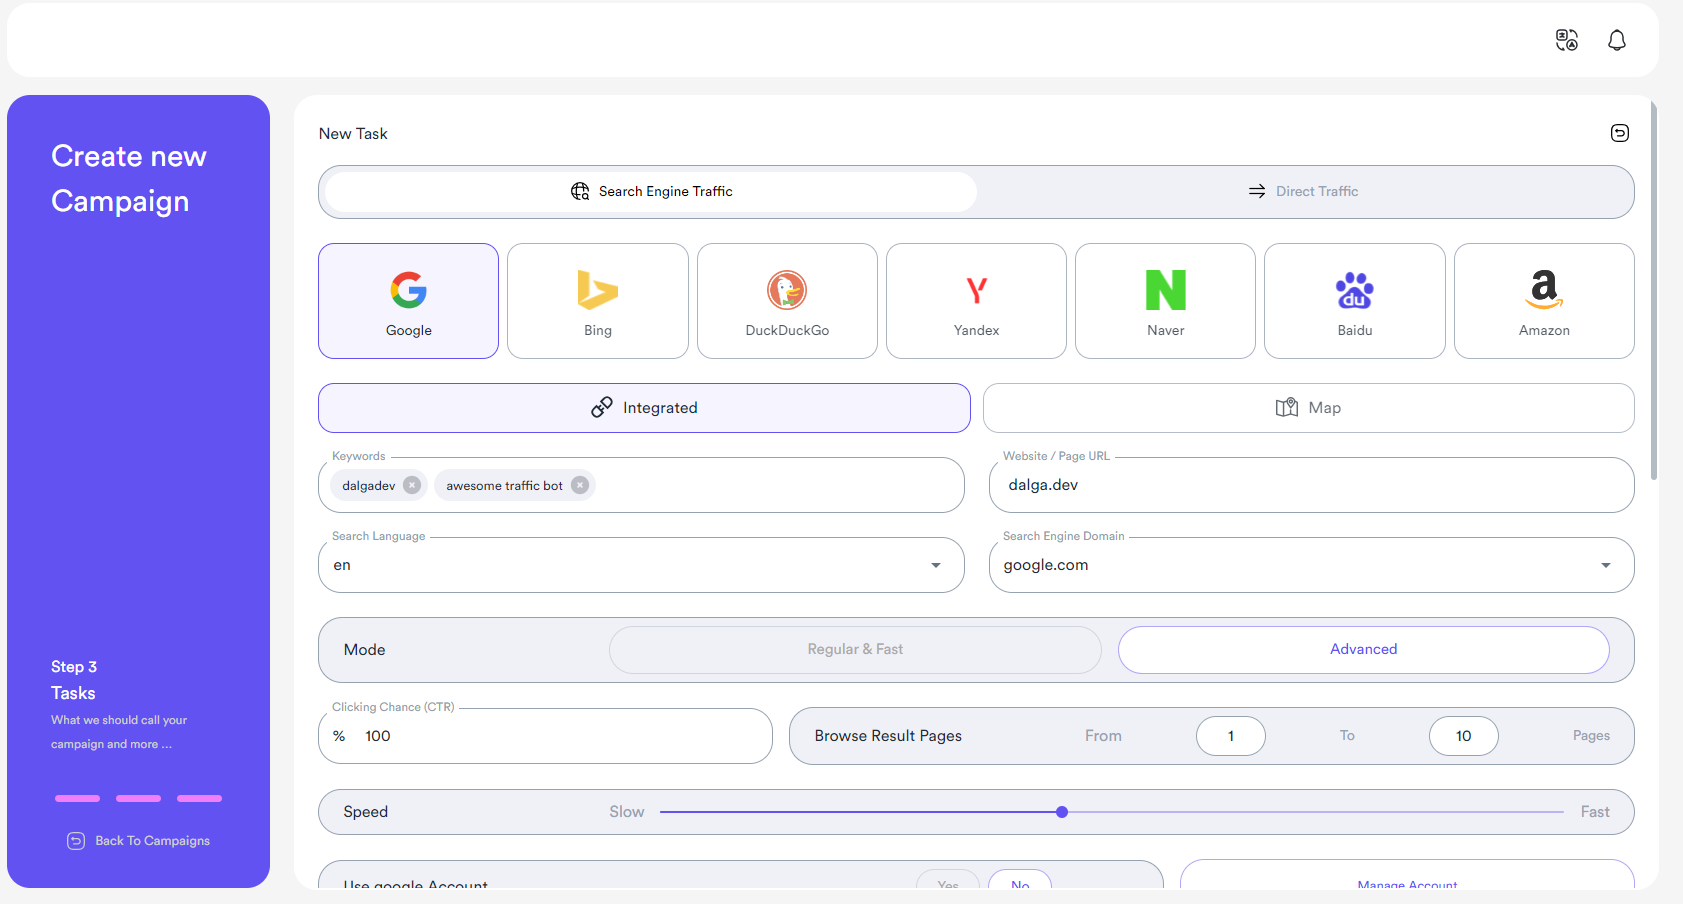
What are the differences between regular mode and Advanced? Selecting between Regular or advanced modes are only available for Google Search Engine. Other engines are set to Advanced mode by default. In the advanced mode, the bot will do more simulated and human-like behavior. It will go to google.com and type your keyword, will scroll and browse each results page of google, and after finding your website will click on it. This will have a better impact.
However, in the regular mode, the bot will directly go to the link of 100 search results and will click on your website.
On both modes, clicks will be visible on search engines but the advanced mode has a better impact and on the other hand, the regular mode is speedy!
NOTE: Regular mode is only available on Google mode. Other search engines are set advanced mode by default.
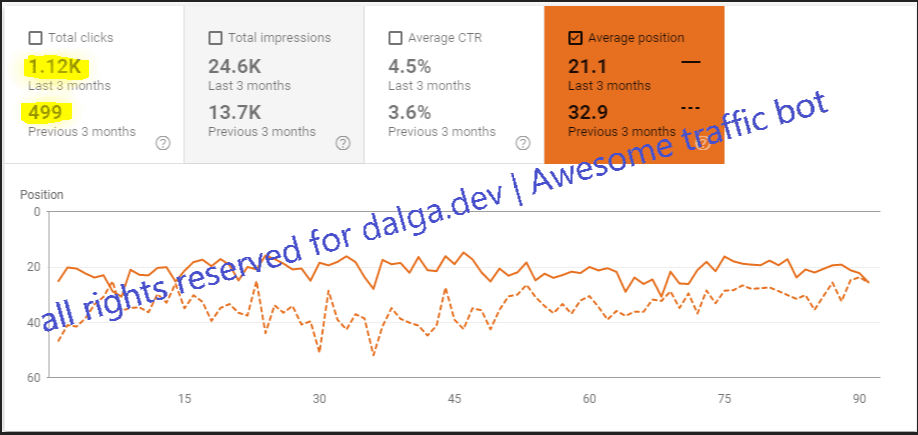
Google Analytics will show traffic as Organic but it will not show the keyword due to their latest update in 2011:
https://analytics.googleblog.com/2011/10/making-search-more-secure-accessing.html

Import Accounts
If you use Google, Bing or Naver modes, you can import Gmail, Outlook and Naver accounts. To use accounts, first make sure you enable the related feature.
Then, you'll need to click on Manage accounts and once the modal has opened, you can enter the details of your accounts. You can also import from a text file with this format:
[email protected]:password|Recovery email
[email protected]:password2|Recovery email
Entering the recovery email is not necessary. However, if you've set it already, Google may ask for the address of recovery email. So, it's recommended to provide.
Recovery email is only used in Gmail accounts. The other methods essentially don't need recovery emails.
After entering the accounts, you can save them into a profile and name them. So, you can use them again later.
Google Maps and Naver Maps mode
The set up is exactly like how we described in the search engine mode. However, there's an important note which you will need to enter your Business Name as it appears on Google Maps instead of your website URL to make the bot able to find your GMB listing.
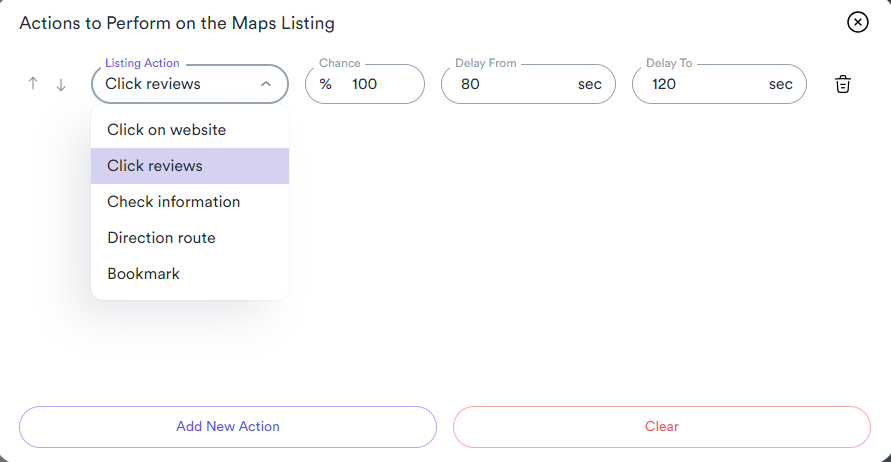
For Google Maps you can also specify the actions you want the bot to make. To specify the actions you need to install the version 2.0.3 and later then click on the button placed in the Actions to Perform on the Maps Listing section.
If you want to work with GPS simulation check the sections written below.
Direct Traffic
STEP1: Select and click on Direct Traffic as the traffic mode. Then we'll be able to configure it further to place the social media referer and others.
STEP2: In this example, we want to drive traffic from about.com as our referrer. So we enable Social Media option, then will select (or type the referrer address) then will click on the + button to add the referrer.
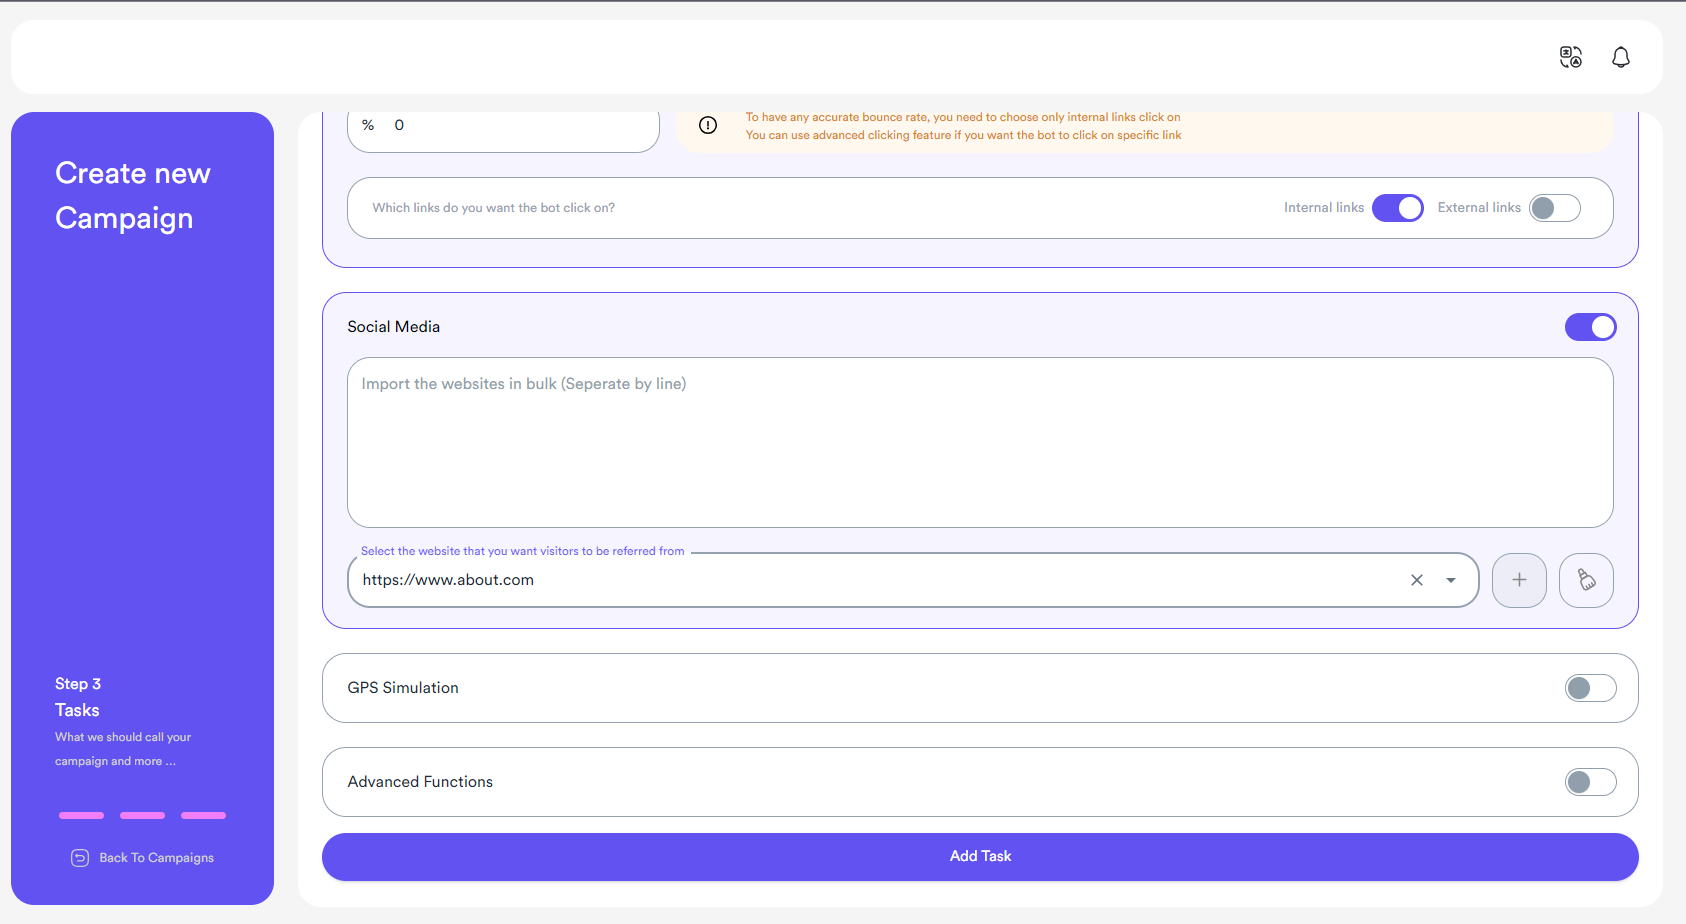
NOTE: This method will put the selected social media in the browser’s request headers. So every analytical tool will show this traffic is driven by the selected social media. However, this might not have a huge impact on your website. If you want to use this for SEO, we recommend you use the Search Engine Mode.
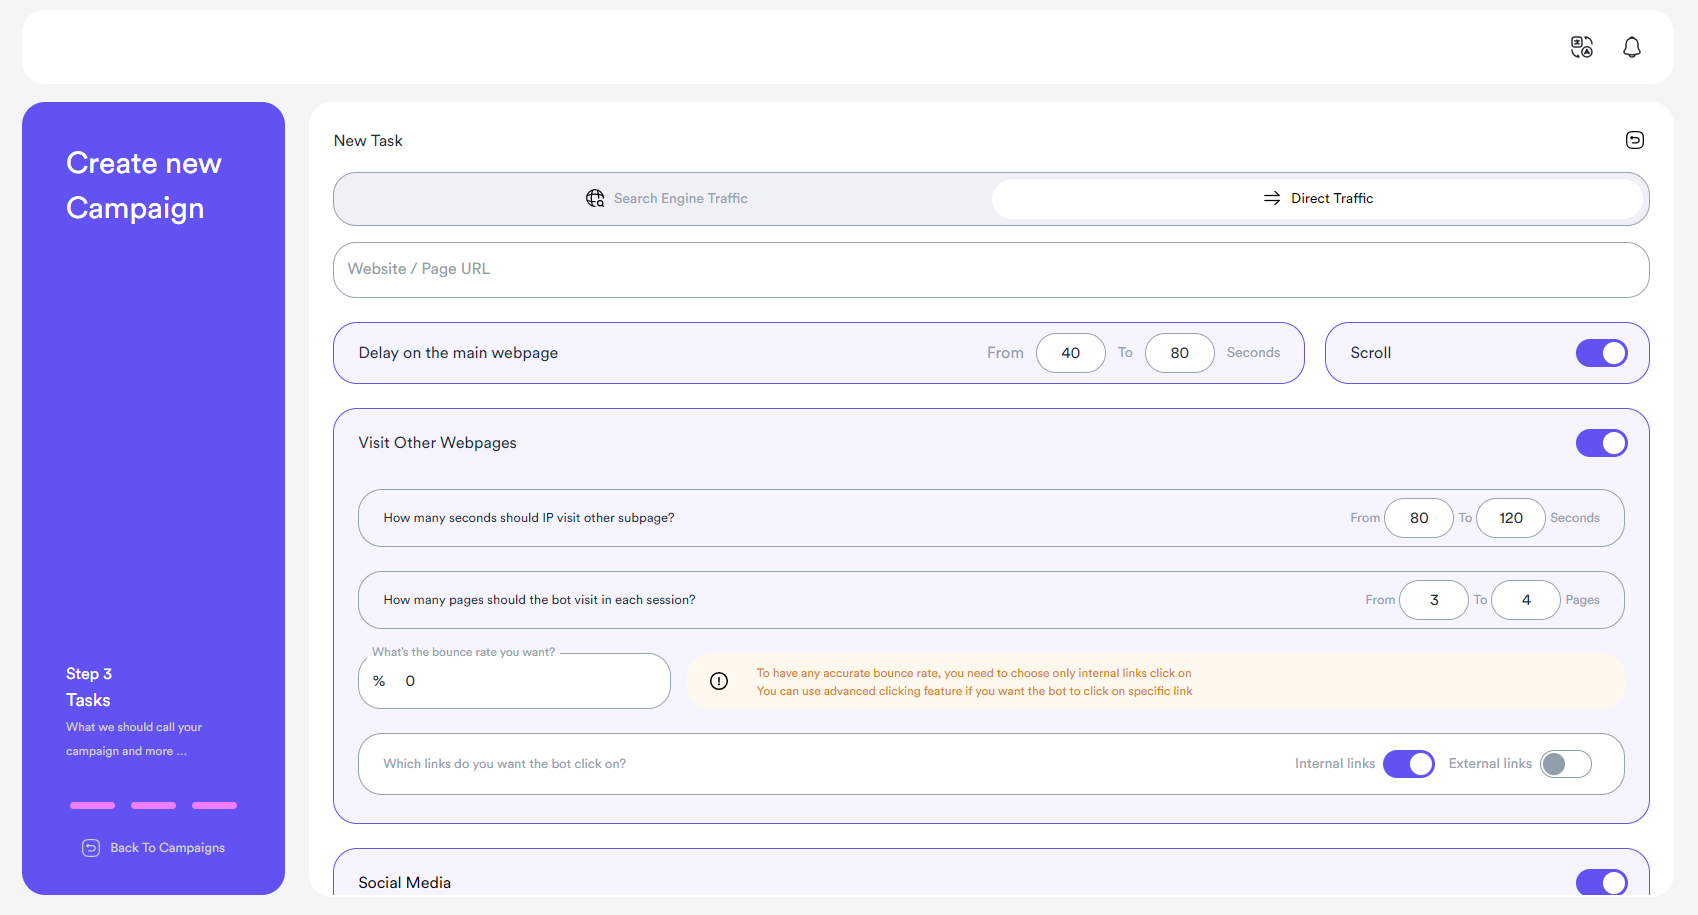
Delay on the webpage
One of the important features of the bot is to set interval and delay time for the bot while it's visiting your target webpage. It's also called session duration.
It's recommended to set the delay between 80 - 120 seconds.

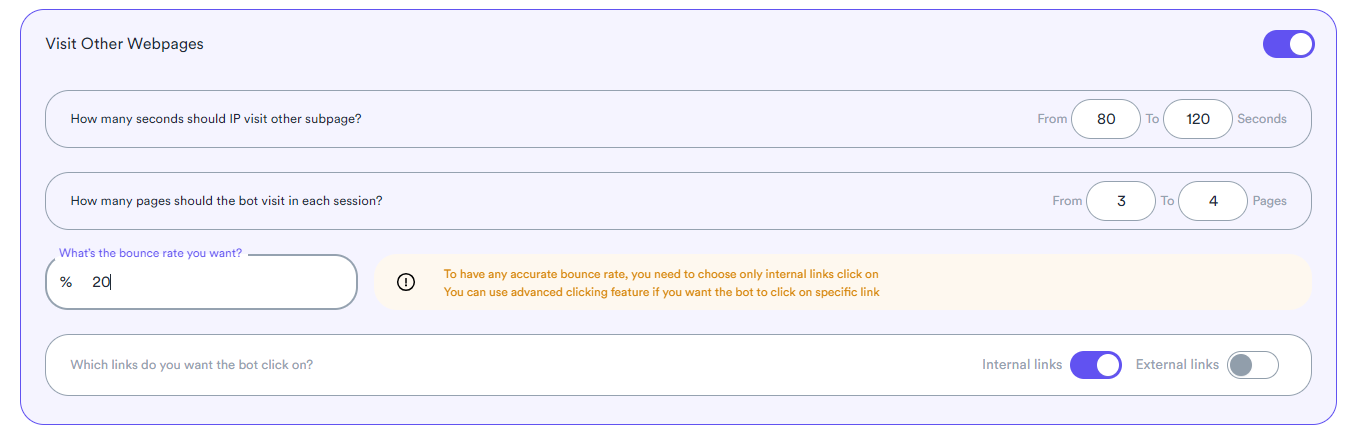
Visit Other Webpages
This feature is also important. By this feature, you can set the bot to visit not only your target webpage but also the internal and external links of your website. This feature also has an option named "Bounce Rate". It basically means how often the bot should visit other webpages.
WikiPedia Says: Bounce rate is an Internet marketing term used in web traffic analysis. It represents the percentage of visitors who enter the site and then leave ("bounce") rather than continuing to view other pages within the same site. Bounce rate is calculated by counting the number of single page visits and dividing that by the total visits. It is then represented as a percentage of total visits.
Bounce rate is a measure of "stickiness." The thinking being that an effective website will engage visitors deeper into the website thus encouraging visitors to continue with their visit. It is expressed as a percentage and represents the proportion of single page visits to total visits.
As you enter the bounce rate, the lower you go, the better it gets.
We recommend you to enable this feature and set the bot to visit 3-4 pages for at least 80-120 seconds with 20% bounce rate.
GPS Simulation
This feature is used for simulating GPS (device) location. This can be used by search engines and especially maps to determine and estimate the location of the user. However, this doesn't affect the systems that use IP locations for determining the location of visitors.
You can add GPS locations by several different methods.
Built-in Maps Selector
After you enabled the GPS simulation feature, then you can click on the maps icon to open the maps.
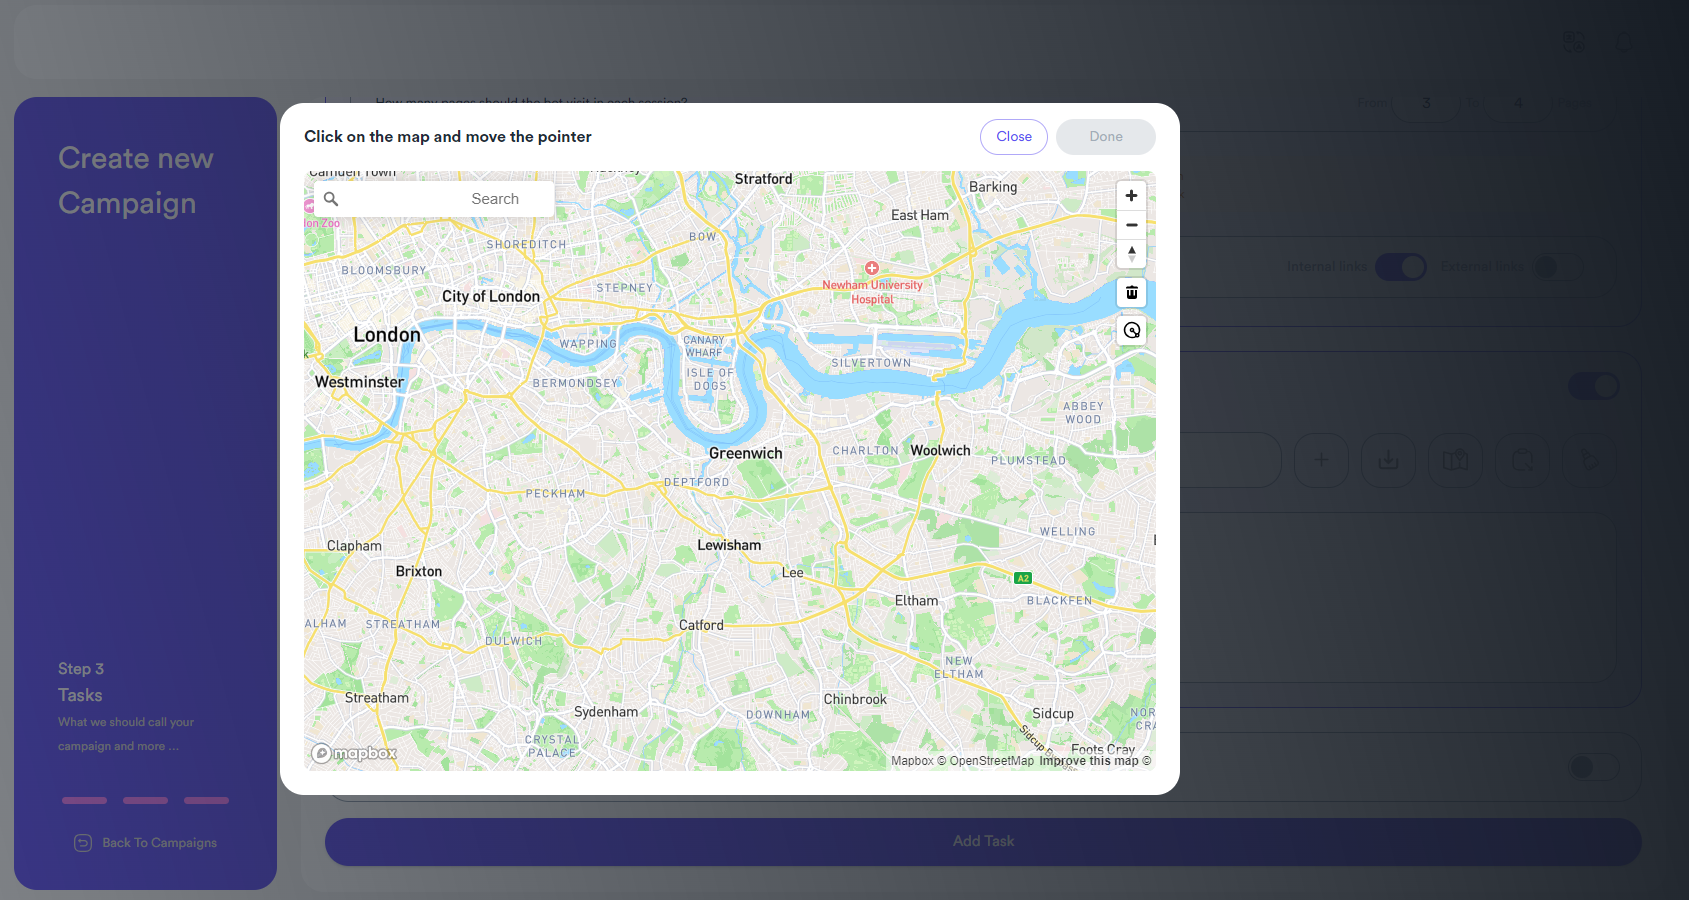
You can enter the name of location (streets, famous places, etc.) to move the Maps into that location. Then you can click on the desired location and move the mouse out of the center to make the application to automatically calculate the radius. So, the bot can randomly select any location inside the area you've selected.

Location Names
You can also simply write famous location or streets name and the bot will get the coordinations automatically. For instance, you can write
Times Square Golden Bridge Bond Streets
Each location should be separated by new line.
Manual Coordination
You can also write the coordinations manually. Also, you can define a range of longitudes and latitudes. You need to enter the locations with this format:
latitude:longitude
If you want to define a range, you need to define it like this:
latitude1-latitude2:longitude1-longitude2
Latitude 1 should be lower than latitude2. The same applies to longitude1 and longitude2
For example: -25.12507870--20.00480:-40.804874--40.50.
It means latitude between (-25.125078780 and -20.00480) also longitude between (-40.804874 and -40.50). Since the numbers are negative, you will actually have two dashes (-). So, it's not a typo when you see two double dashes here.
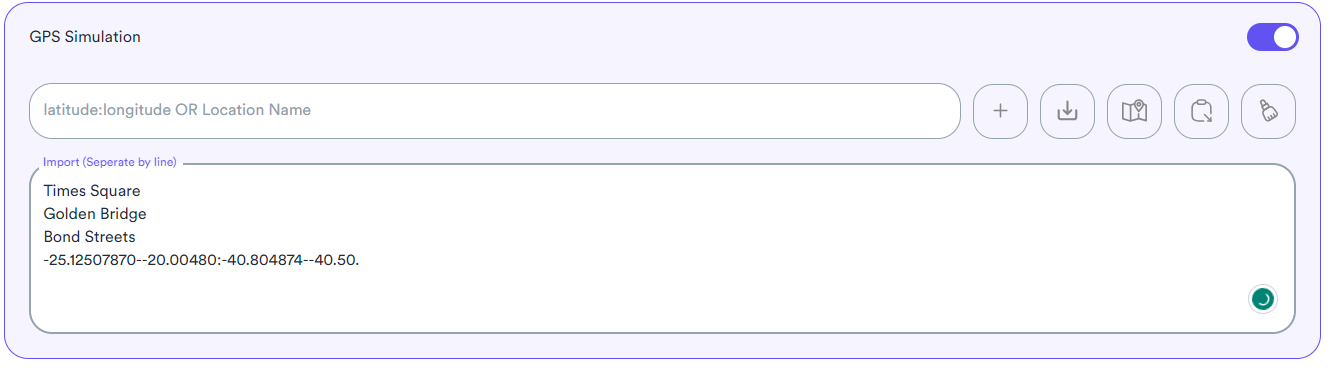
Importing From a text file
If you want to import the location names or coordinations, you can also import it a from text file. Each location name or coordination should be separated by a new line.